Your First Crypto Wallet
This multi-part guide is meant to help you get started in Decentralize Finance (DeFi). Feel free to participate or just follow along. We’ll outline the risks of participating in the Foot Guns section of each article, and link to further resources.
To participate in DeFi the basic requirement is a crypto wallet that allows you to interact with all the various protocols. Don’t worry. It’s not that hard. Some smart people are building software to make it easier. There are many wallets out there but we are going to focus on Metamask. Because we use it, we like it, and its industry standard.
Complete Noob Section (skip if you already own crypto)
If you don’t already have an account with a cryptocurrency exchange then this guide will be your first step. If you know what self-custody is already move on to the install guide further below.
First you need access to an exchange that allows you to withdraw the crypto you buy. In the United States the simplest place for this is Coinbase or if you prefer an alternative is Kraken. If you’ve already got a exchange you prefer great. Moving on.
Self-Custody
Before you start using a tool like Metamask we need to talk about self-custody. When you open an account at the bank or a brokerage you transfer funds to them either physically or digitally and in turn give them permission to custody those funds. They provide you ways to access the funds but the funds remain in their possession until you withdraw them from their systems.
When you take self-custody of your crypto tokens using Metamask you remain in possession of your tokens. Metamask does not hold your tokens for you. It achieves this by giving you access to a private key (letters and numbers) that is mathematically improbable (nearly 0%) for any one to recreate. You can save this private key on a hardware wallet, a piece of paper, a metal etching, or however you see fit. You would then store that in a safe or even put it in a safety deposit box at the bank (*Bitcoin Maxis cringe*).
Please spend some time seriously deciding your self-custody approach.
Here is the UK governments guide to protecting your private keys.
Another guide from hardware wallet creator Ledger.
We biased to Ledger and Trezor as another option.
Look we know this is a pain in the ass, but do you just want to sit back and watch? Or participate in the rapidly expanding DeFi space. Sitting back to watch and educate yourself is okay too.
Stop here and consider how much money you want to play with in DeFi. If it’s $50, maybe sit back an watch. If it’s $500, save your private key on a usb-drive and put it under your mattress. If it’s $1000+, then really take some time to consider the safety of your private key before moving money into Metamask or any self-custody crypto wallet.
Okay; now you’ve got your self-custody plan ready? Lets go!
Installing Metamask
The hard part is coming up with your private key management strategy we mentioned above.
Installing Metamask is easy.
If you really need a guide.
Our experience with Metamask is in the Chrome browser on Windows. Feel free to send questions to our email or leave comments below.
Funding Your Wallet
The following example is using Coinbase as our exchange and Metamask as our self-custody wallet. If you don’t like either of these the same logic applies to your favorite tools.
In Google Chrome (or your browser) :
Log into your Coinbase account. You should have already purchased ETH.
You can use any ERC-20 token you want, but you must move some ETH to your Metamask in order to send funds back from your Metamask. ETH is the currency used when paying for transactions in DeFi applications.
We’d recommend 100% ETH (if you want exposure to price movement already) or 5% ETH and 95% USDC (if you want a stable value in $), but this will increase your transaction cost to move the funds to Metamask. Either way you cannot do 100% USDC because ETH is what you use to pay for transaction fees. We recommend a minimum of $50-$200 in ETH to pay for transactions. Using the Ethereum network is not cheap and the cost of transacting is variable, going up when the network is under high demand.
Note: Coinbase can take several days to settle purchases and unlock access to your crypto. Until then you wont be able to send anything to Metamask. Coinbase will eventually send you an email telling you your funds are available.
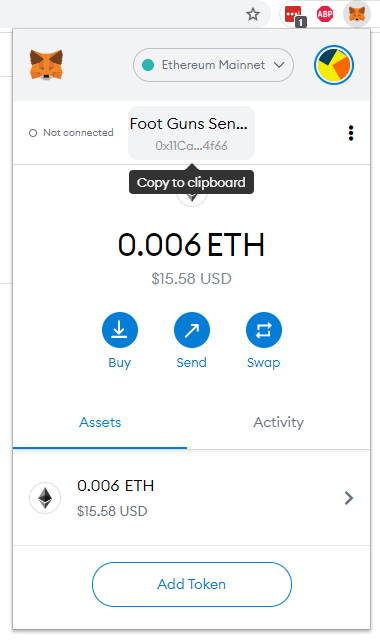
Click on the fox face extension in your browser.
Click on the string of letters and numbers beginning with 0x to copy your Ethereum address. This will be the location you will be sending your funds to from Coinbase.
Note : This is your public facing key. You can share this key with anyone and they can use their own Metamask wallets (or their favorite crypto wallet) to send you funds. Never share your private keys with anyone (the key you wrote down when you created your wallet).
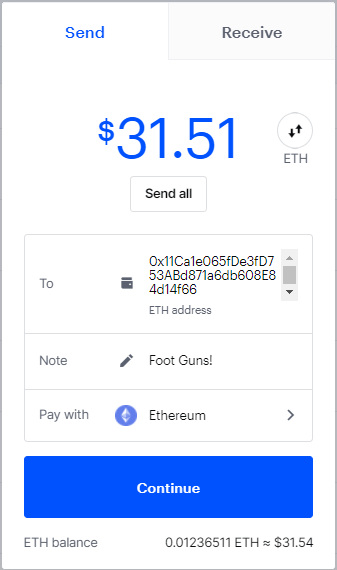
Now that you’ve copied your public address to the clip board. Go to your portfolio in Coinbase and chose the ETH you’d like to send. Paste the public address in the “To” input box.
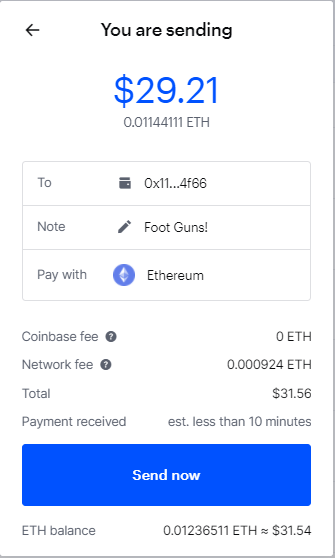
Double check the first and last four letters and numbers match the address in your Metamask. Then click Continue.
The Ethereum network fees are high currently because many people are using the Network.
If you are sending $5000 then the fees are negligible. The Ethereum fees increase with network usage not the amount being sent. Sending small amounts can have a huge reduction in the amount of Ethereum in your wallet. We’d recommend considering the highly volatile Ethereum fees before entering the DeFi space. However, Ethereum 2.0 promises smaller and less volatile fees. Watchtheburn is useful for tracking the current cost of transacting on Ethereum.
The funds should transfer quickly and you should see them show up in your Metamask interface similar to the picture above.
Foot Guns - Risk Management
Self-Custody - Holding your own private keys means if you lose them your money is gone. Whatever was in the wallet - all of it!
Metamask has been audited but there is always a greater than 0% risk someone finds an exploit. Even if Metamask is exploited your funds could remain safe as they are protected by cryptographic encryption as long as your private key remains hidden.
Transfers - Because you are in complete possession of your funds sending them to the wrong public address could result in a lose of all funds. There is no way to recover them. No customer support. Remember it’s nearly mathematically impossible to generate 2 of the same private keys. Once a private key is lost it’s gone forever.
Network Fees - Until ETH2.0, the Ethereum network experiences fee volatility in times of high price volatility. Transfer fees could become detrimental to wallets holding all small amount of funds.
Scammers - This could fall under self-custody as well. When you have possession of your private keys you must protect yourself from scammers. Be cautious before clicking on links in emails especially for offers relating to cryptocurrencies. If it sounds too good to be true. It is!
There are many other risks you need to be aware of when interacting with DeFi protocols using your Metamask wallet. We will cover these in Part 2 of this series where we discuss using DeFi protocols to buy and sell crypto tokens.
If you found this guide helpful please share it with others you know who many benefit from reading it.


